Skip-the-cart flows stopped being a CRO experiment a couple of years ago. In 2026 they are baseline for stores selling configurable products under $80, but WooCommerce still ships every visitor through /cart/ first. If you have been searching how to set WooCommerce to skip the cart without breaking variation logic, coupon fields, or shipping calculation, this article covers the settings, the one-line snippet, the plugin trade-offs, and the test plan I run on client stores before pushing the change live. I have shipped this configuration on 70-something stores in the last three years. About a third saw a real conversion lift. The rest needed a different fix entirely, and I will get to that.
Why You Should Set WooCommerce to Skip the Cart in 2026


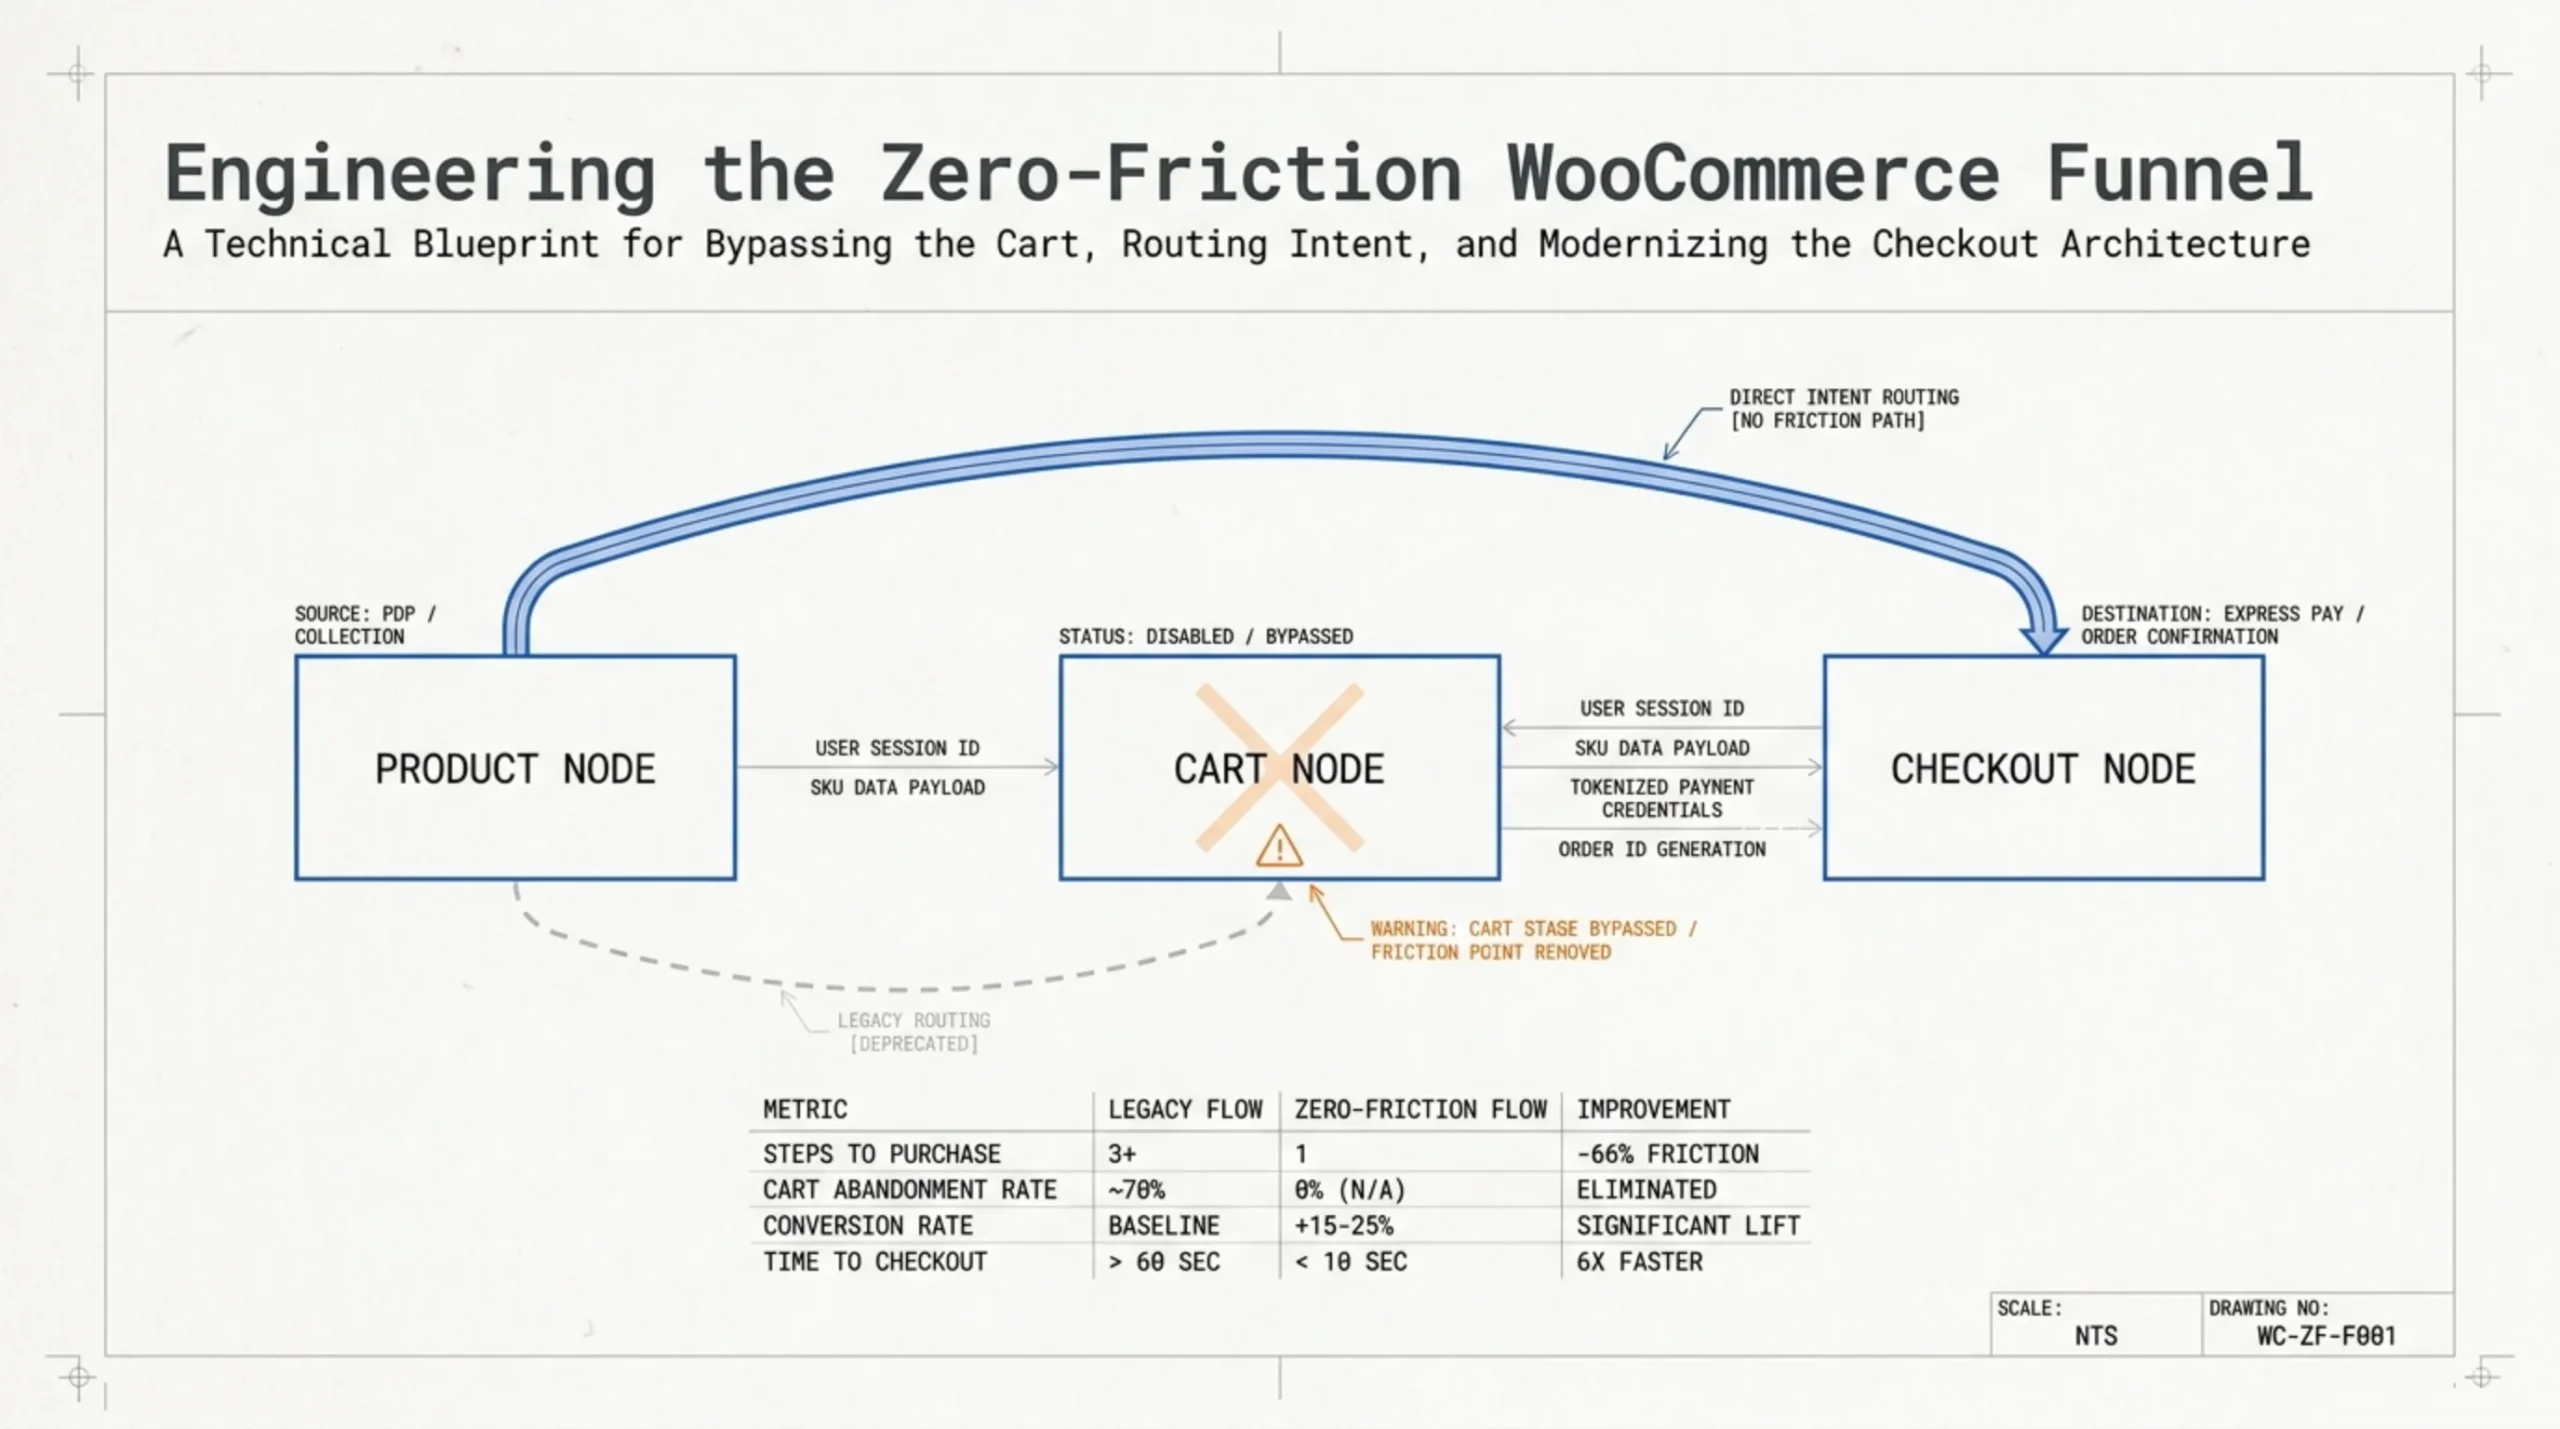
The case for skipping the cart is not “fewer clicks equal more sales.” That framing is lazy. The actual lever is decision fatigue at the cart step.
Baymard’s running aggregate of cart abandonment studies puts the average cart abandonment rate at 70.19% across 49 separate studies. The reasons are well documented: extra costs surfaced too late, account-creation friction, slow delivery, complicated checkout. The cart page contributes to several of those. It is where shipping cost first appears for most store configurations, and it is the screen most users skim before bouncing.
Now the unpopular opinion. If your average order value is over about $200, or your customer is buying bulk-quantity items, you actually want the cart page. People at that price point want a chance to review quantities, swap variants, apply a coupon they got in an email three weeks ago. Skipping the cart for them looks like you are rushing them. I had a B2B furniture client where we A/B tested skip-the-cart against the default flow for six weeks. Conversion went down 11%. AOV dropped 18%. We turned it off the next morning.
So the question of how to set WooCommerce to skip the cart starts with a question of whether you should. Cheap impulse purchases, single-product funnels, digital downloads, donation flows: yes. High-AOV configurable goods: usually no.
How to Set WooCommerce to Skip the Cart Without Code
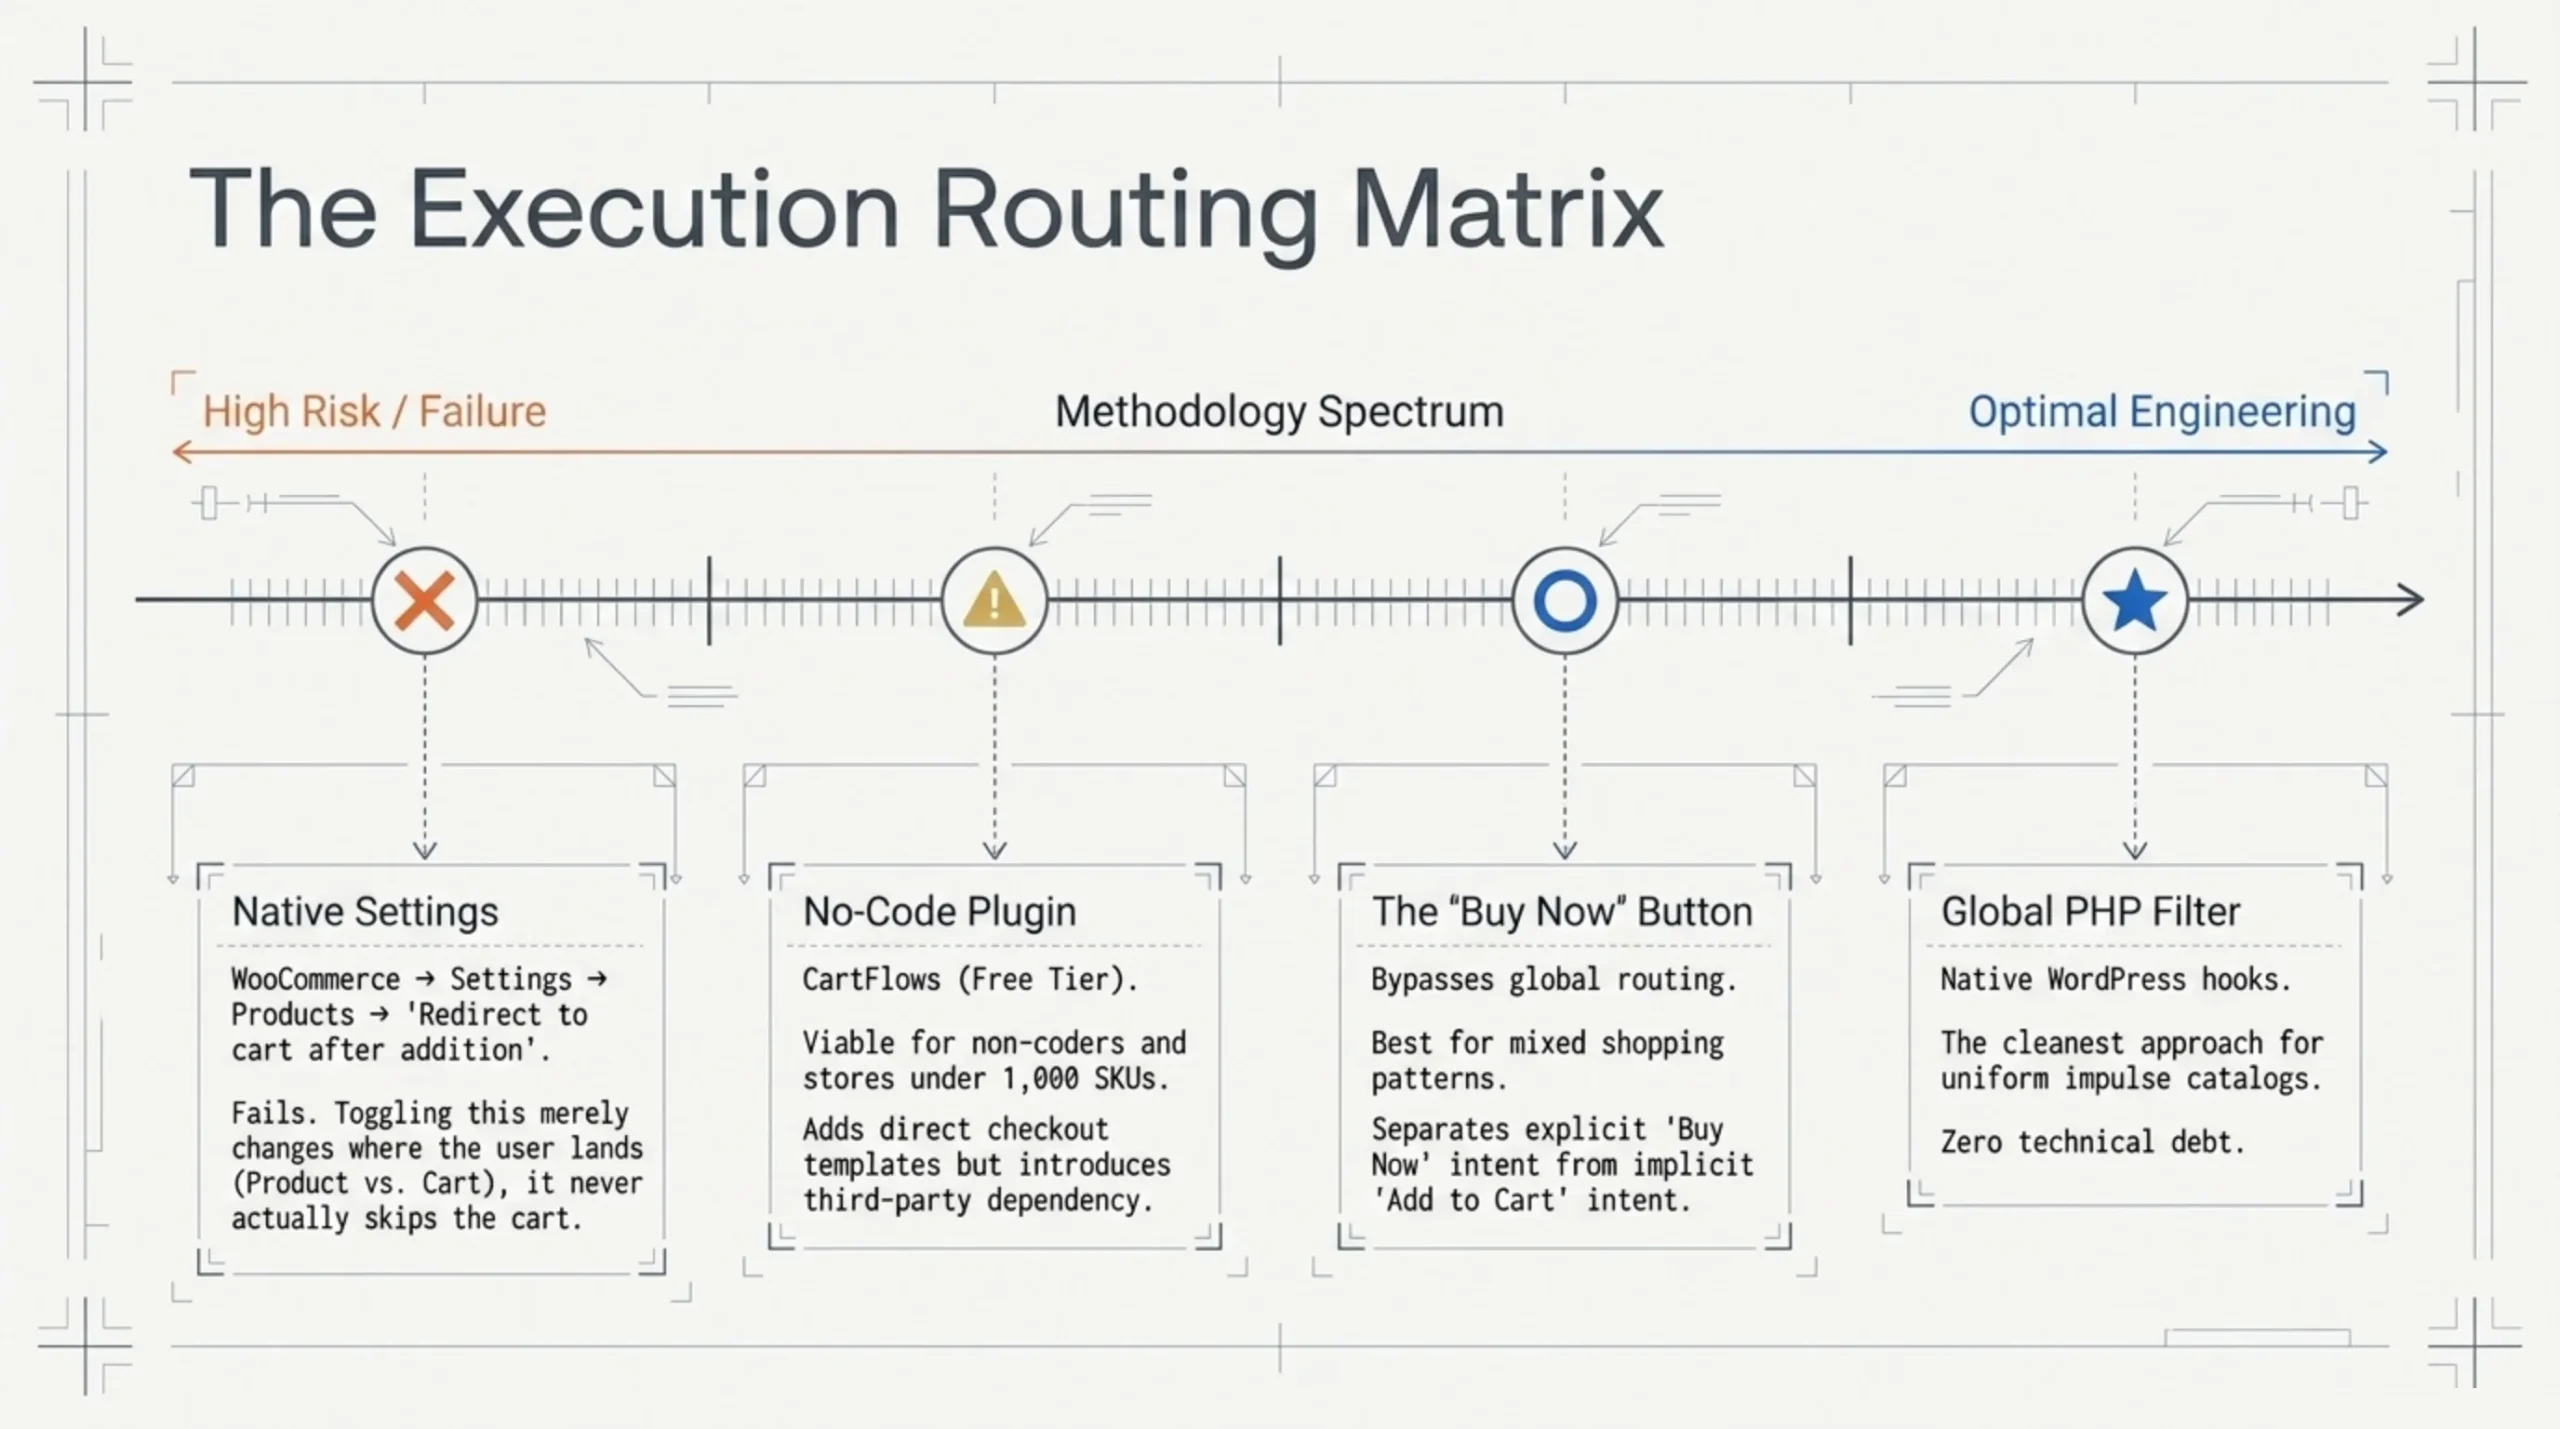
WooCommerce has two cart-related toggles in WooCommerce → Settings → Products → General. The relevant one is “Redirect to the cart page after successful addition.” Toggling it off does not skip the cart. It leaves the user on the product page after add-to-cart. Toggling it on sends them to the cart. Neither setting actually skips the cart, which trips up about half of the people I see asking how to set WooCommerce to skip the cart in WordPress forums.
The complete list of cart and product flow settings lives in the official WooCommerce settings reference. Read that page once before you change anything. The order in which add-to-cart filters fire is non-obvious if you have not built a custom WooCommerce theme.
For a true skip-the-cart redirect on a vanilla store, the cleanest approach is one filter:
// In your child theme's functions.php
add_filter( 'woocommerce_add_to_cart_redirect', 'brk_redirect_to_checkout' );
function brk_redirect_to_checkout( $url ) {
    return wc_get_checkout_url();
}
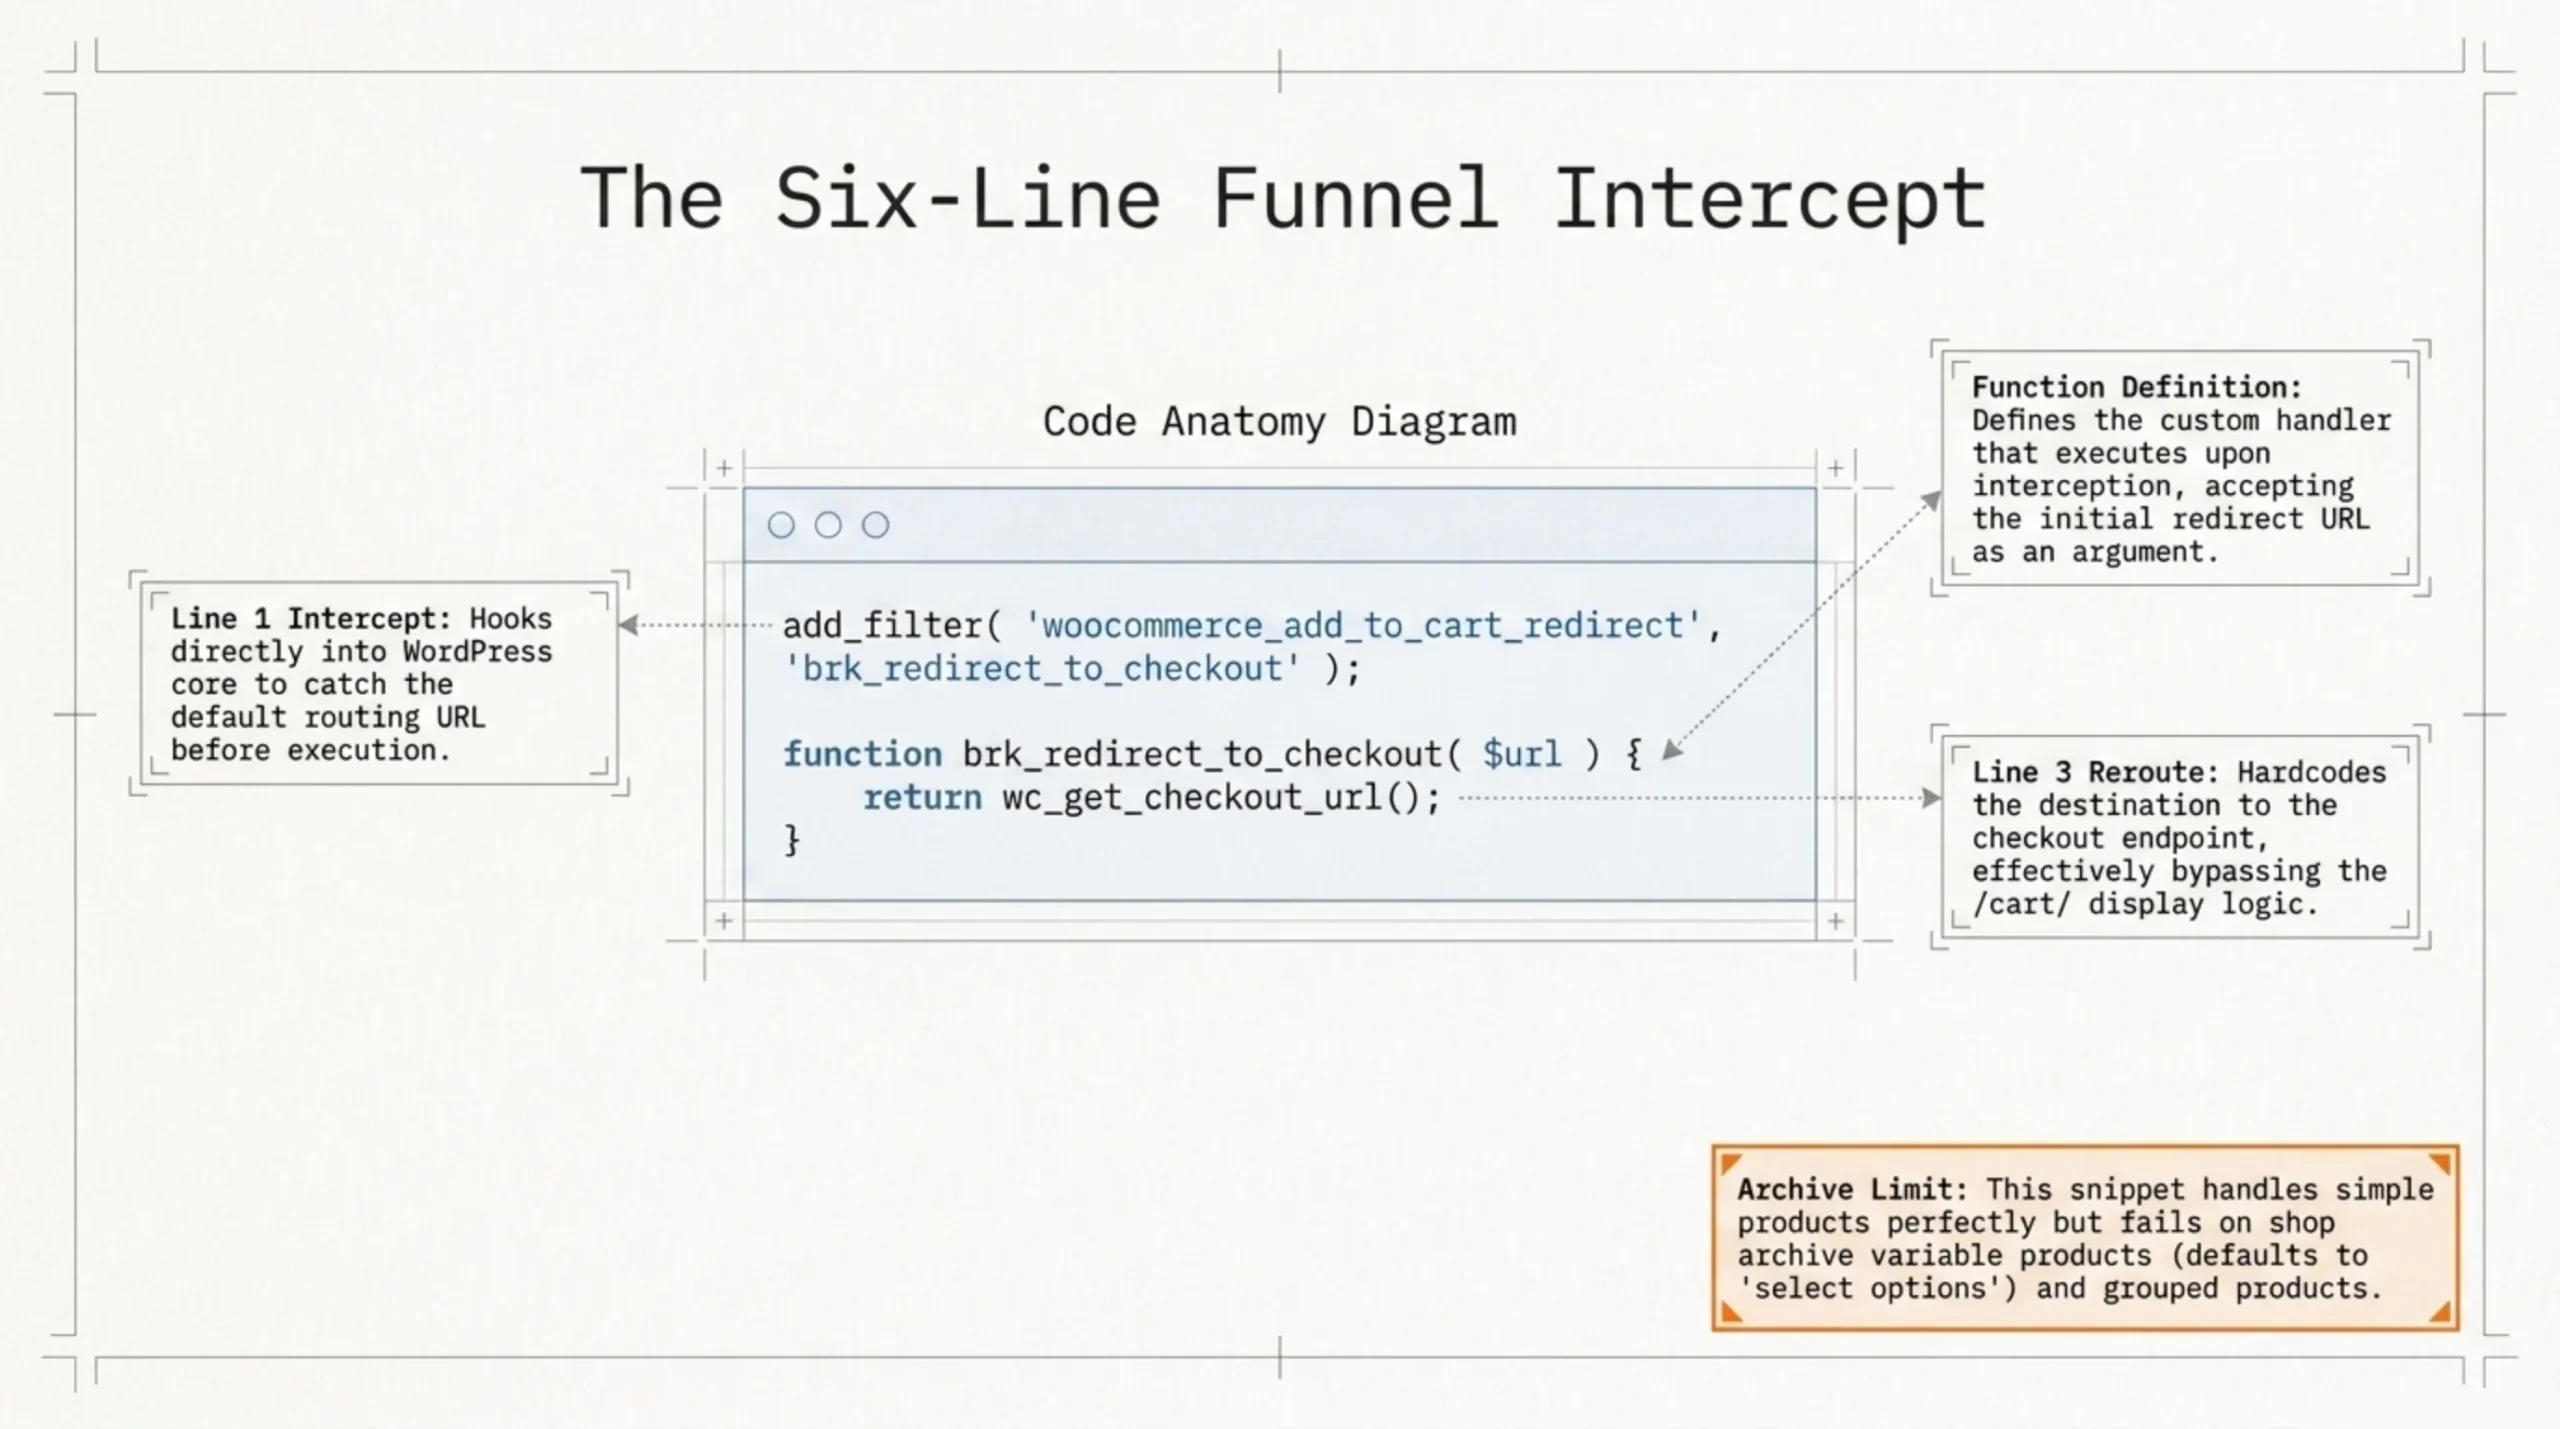
Six lines, no plugin, and it handles simple products correctly. It does not handle variable products on the shop archive (because WooCommerce defaults to “select options” routing) and it does not handle grouped products (which add multiple line items in one POST). For those you either keep the cart page or you wire up a “Buy Now” button on the product detail page that bypasses the archive entirely.
If you do not want to touch code, CartFlows on .org has a free tier that exposes the same redirect plus optimized one-page checkout templates. The paid version adds order bumps, which is where it earns its license fee. I have used the free build on stores under 1,000 SKUs without issue.
How to Customize the WooCommerce Checkout Page Around the New Flow
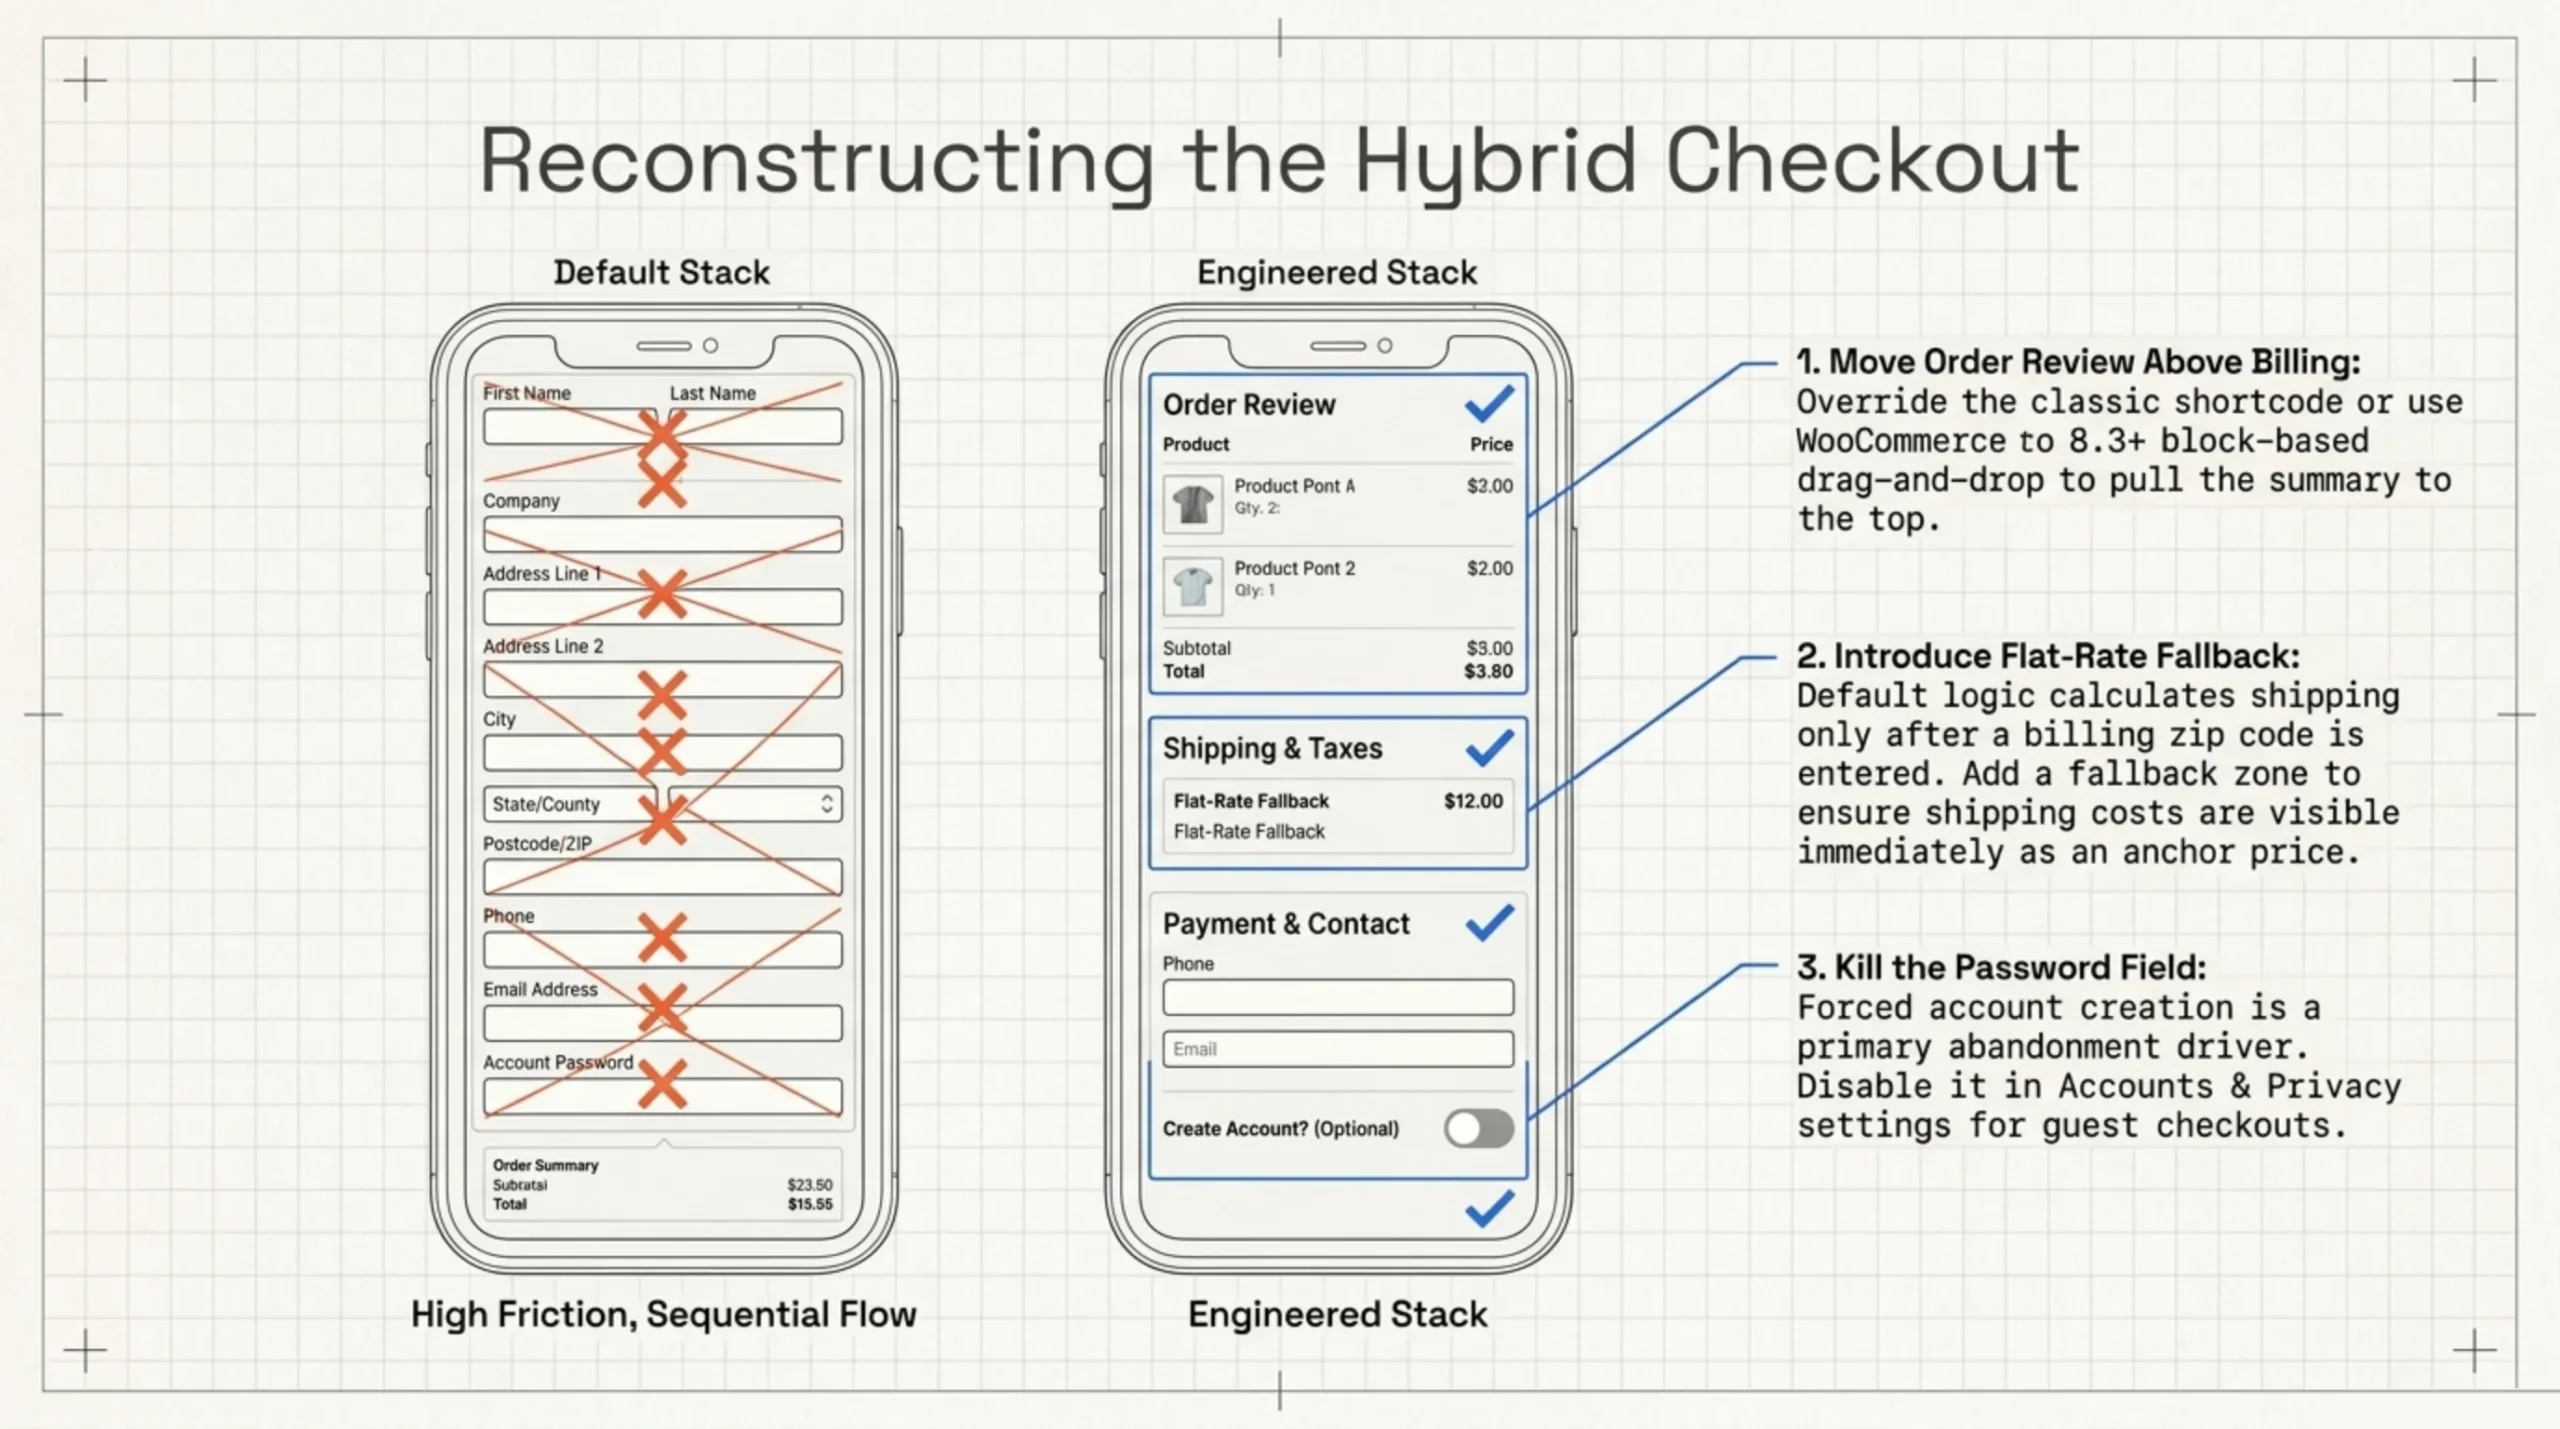
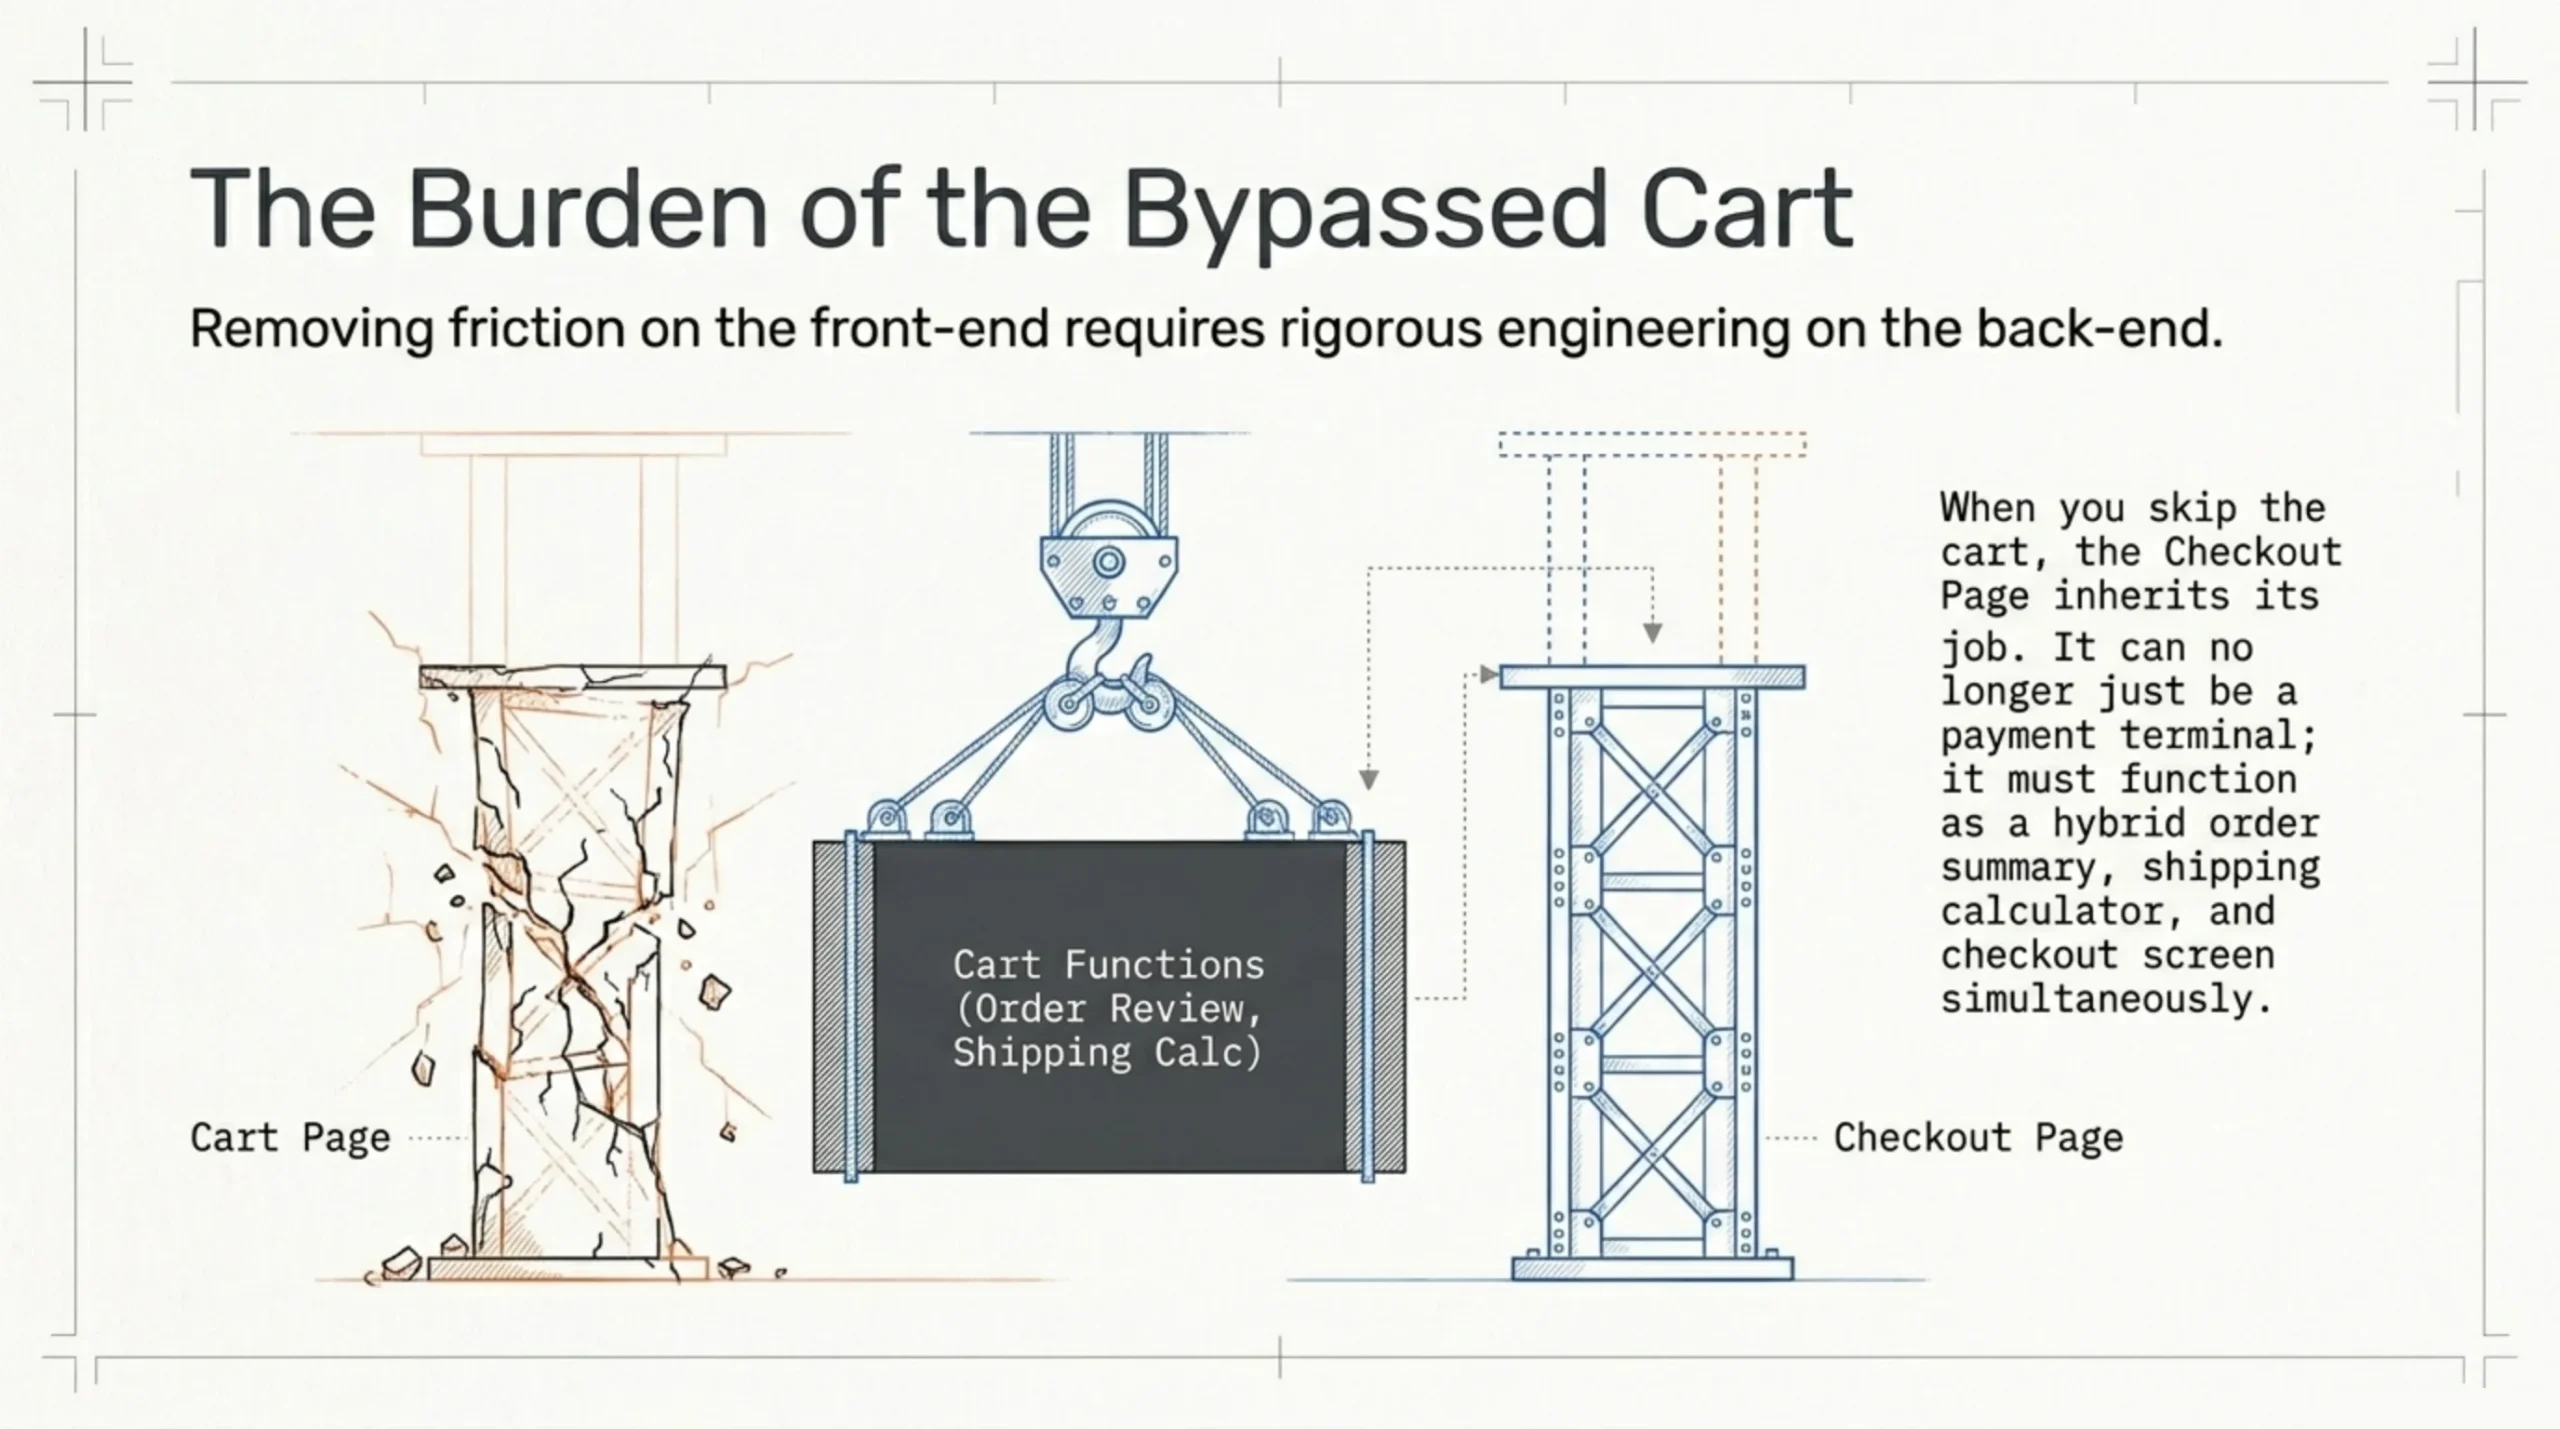
Once you have skipped the cart, the checkout page becomes the only place the user reviews their order. That changes how to customize the WooCommerce checkout page and how to customize checkout page in WooCommerce templates more broadly. The order summary cannot be a tiny sidebar widget anymore. It needs to feel like a cart and a checkout simultaneously.
Three concrete adjustments that earn their keep:
| Adjustment | Where to do it | Why it matters |
|---|---|---|
| Move order review above billing on mobile | Block-based checkout reorder, or template override on classic shortcode | On a phone, default stacking forces 11 fields before a single line item appears |
| Show shipping cost before address completion | Add a flat-rate fallback shipping zone | Default behaviour calculates shipping after billing zip, which is too late for an anchor price |
| Kill the password field for guest checkout | Settings → Accounts & Privacy | Forced account creation is the second-most-cited reason for abandonment in Baymard’s research |
Block-based checkout has been the WooCommerce default since version 8.3 (see the block editor checkout docs), which means the reorder is drag-and-drop instead of a form-checkout.php override. If you are still on classic shortcode checkout, plan a migration window. Maintaining two checkout codepaths is one of the worst engineering tax bills in WooCommerce.
How to Add Custom Fields to WooCommerce Checkout Without Plugin Bloat
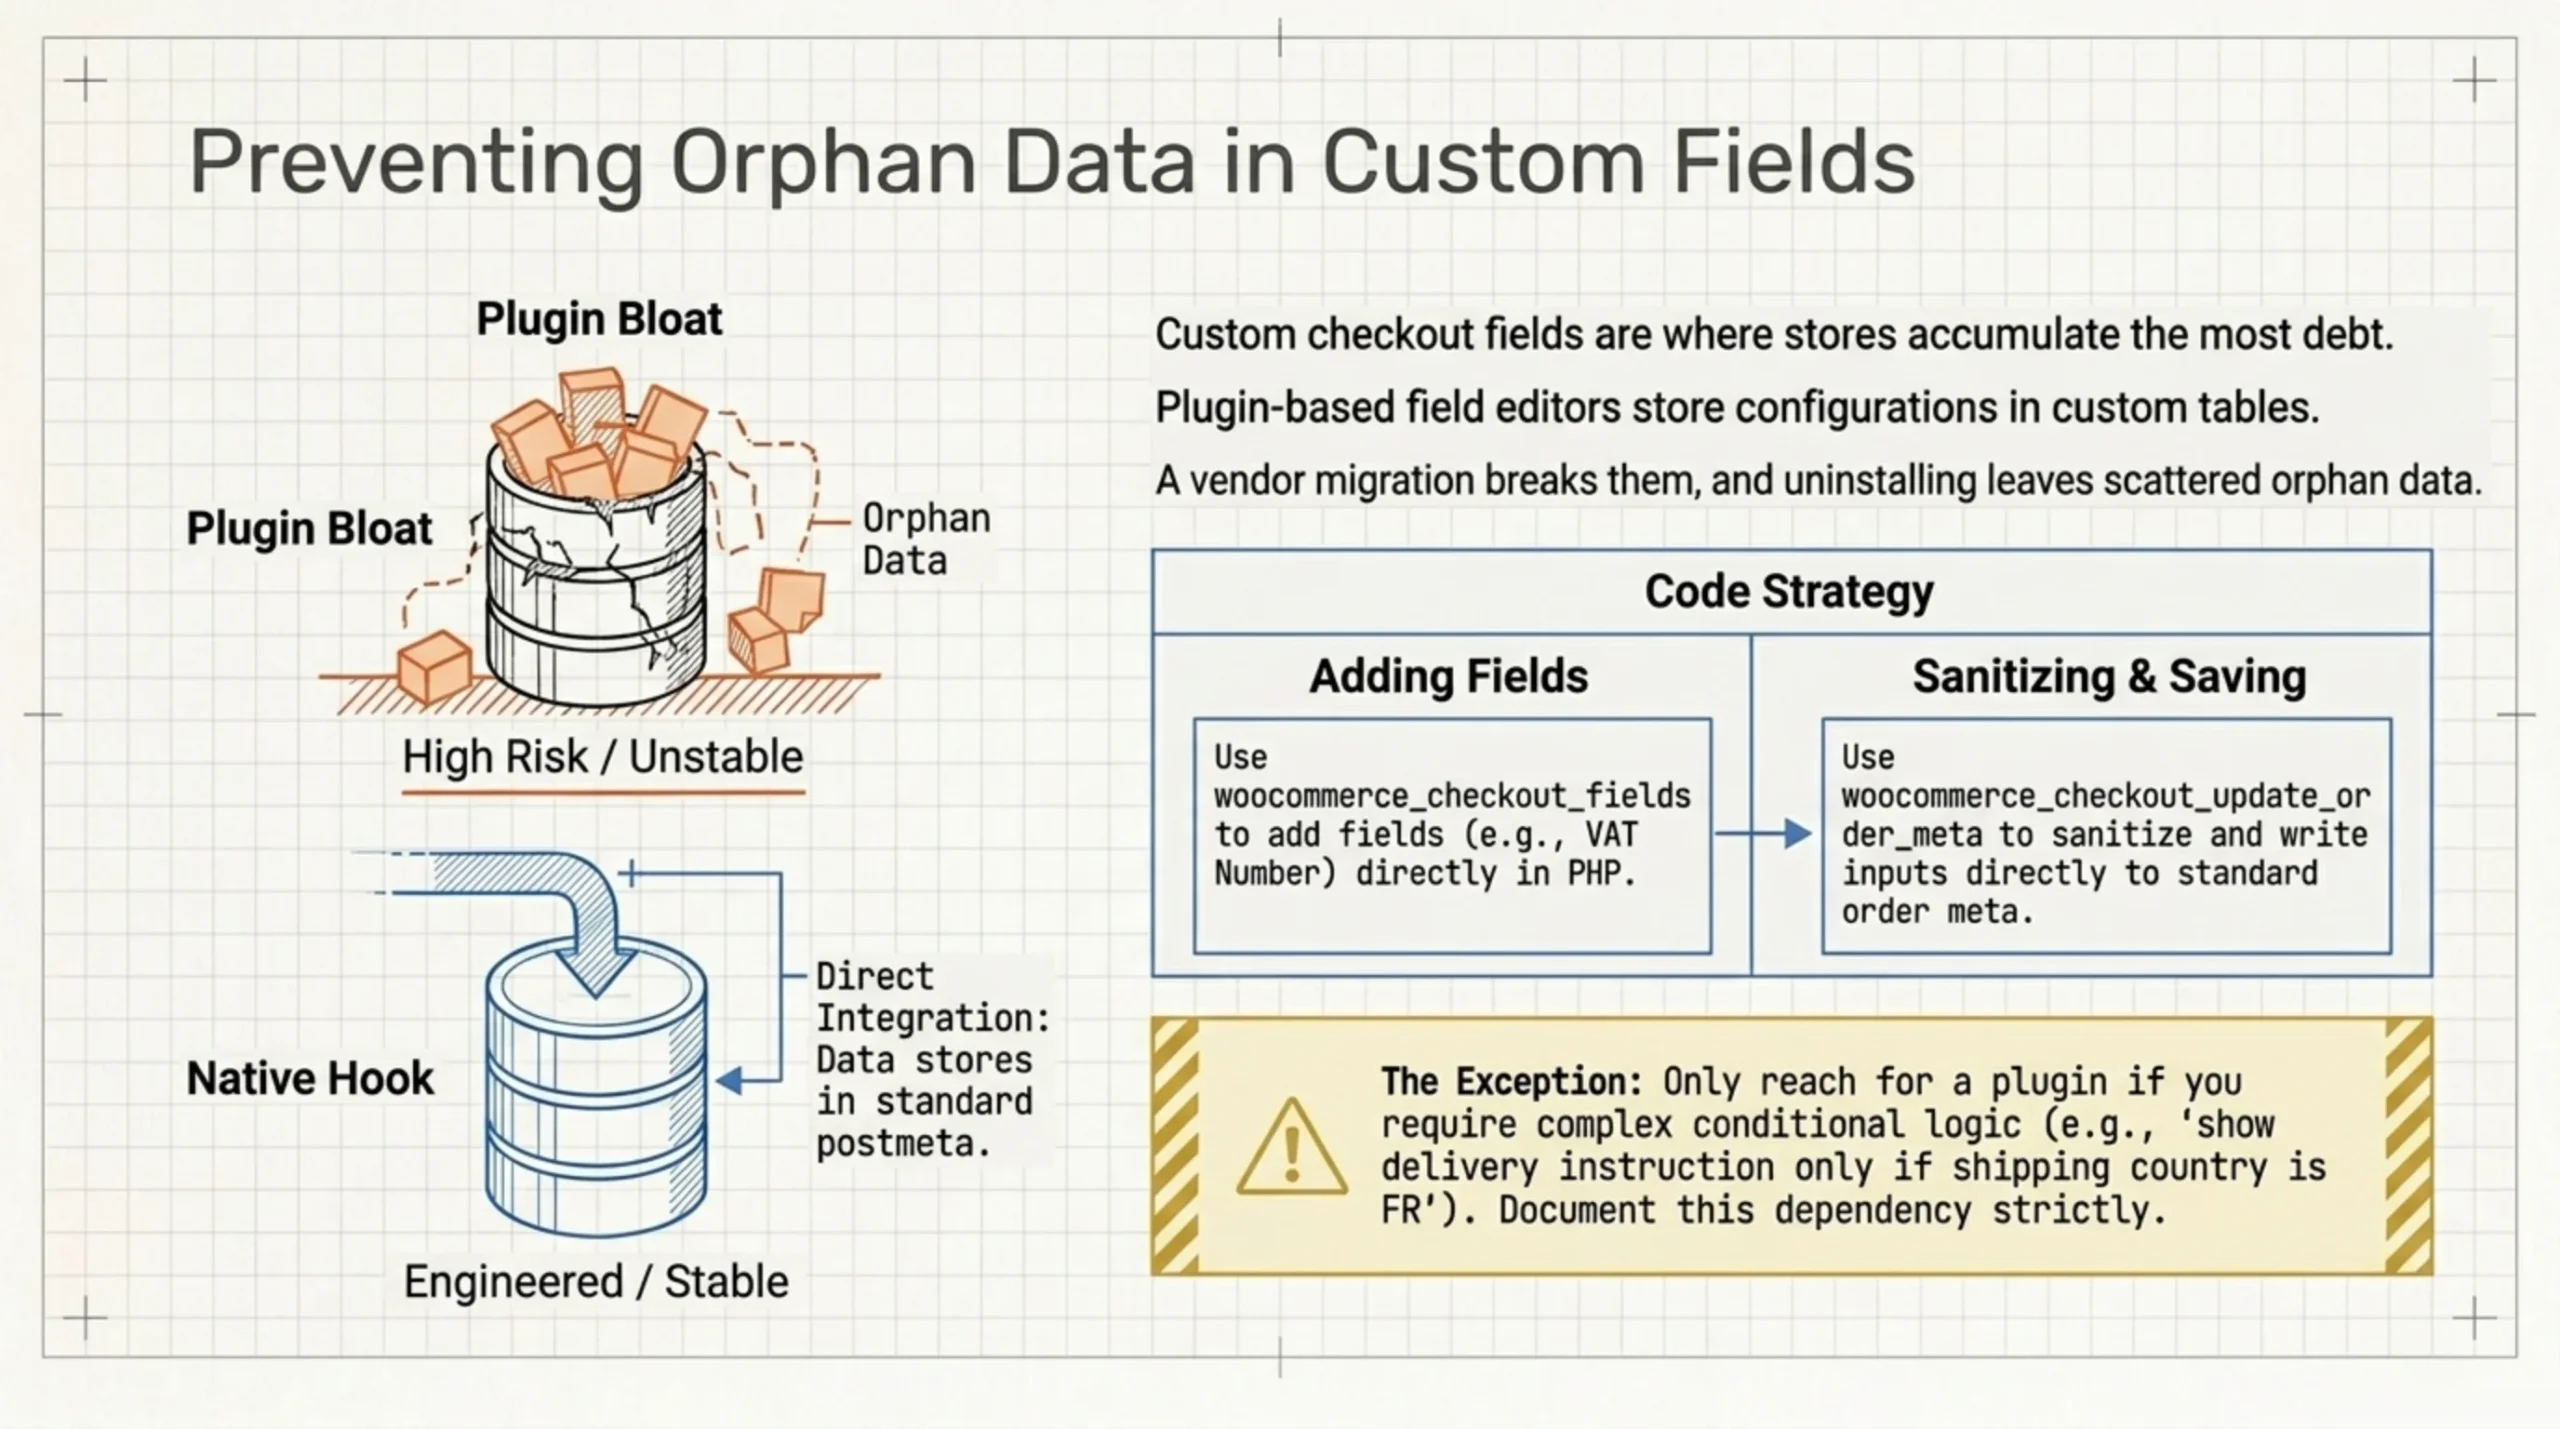
Custom checkout fields are where most stores reach for a plugin and end up regretting it eight months later. The Checkout Field Editor plugins on the marketplace work, but they store field configurations in their own tables. A vendor migration breaks them, and an uninstall leaves orphan data scattered across your database. If you only need two or three extra fields, knowing how to add custom fields to WooCommerce checkout in code is worth the 30 minutes.
The hook is woocommerce_checkout_fields:
add_filter( 'woocommerce_checkout_fields', 'brk_custom_checkout_field' );
function brk_custom_checkout_field( $fields ) {
    $fields['billing']['billing_vat'] = array(
        'label'       => __( 'VAT Number', 'brk' ),
        'placeholder' => 'TR1234567890',
        'required'    => false,
        'class'       => array( 'form-row-wide' ),
        'priority'    => 35,
    );
    return $fields;
}
add_action( 'woocommerce_checkout_update_order_meta', 'brk_save_vat' );
function brk_save_vat( $order_id ) {
    if ( ! empty( $_POST['billing_vat'] ) ) {
        update_post_meta(
            $order_id,
            '_billing_vat',
            sanitize_text_field( wp_unslash( $_POST['billing_vat'] ) )
        );
    }
}
That adds a VAT field, sanitizes the input, and writes it to order meta. It survives plugin churn because it is your code, not someone else’s.
If you need conditional fields (“show this delivery instruction only when shipping country is FR”), the native API does not handle conditionals well. That is the case where I do reach for a plugin, usually Checkout Field Editor for WooCommerce or similar. Pick one, commit to it, and document the dependency in your repo so the next engineer does not undo your work.
How to Test WooCommerce Checkout After You Set It to Skip the Cart
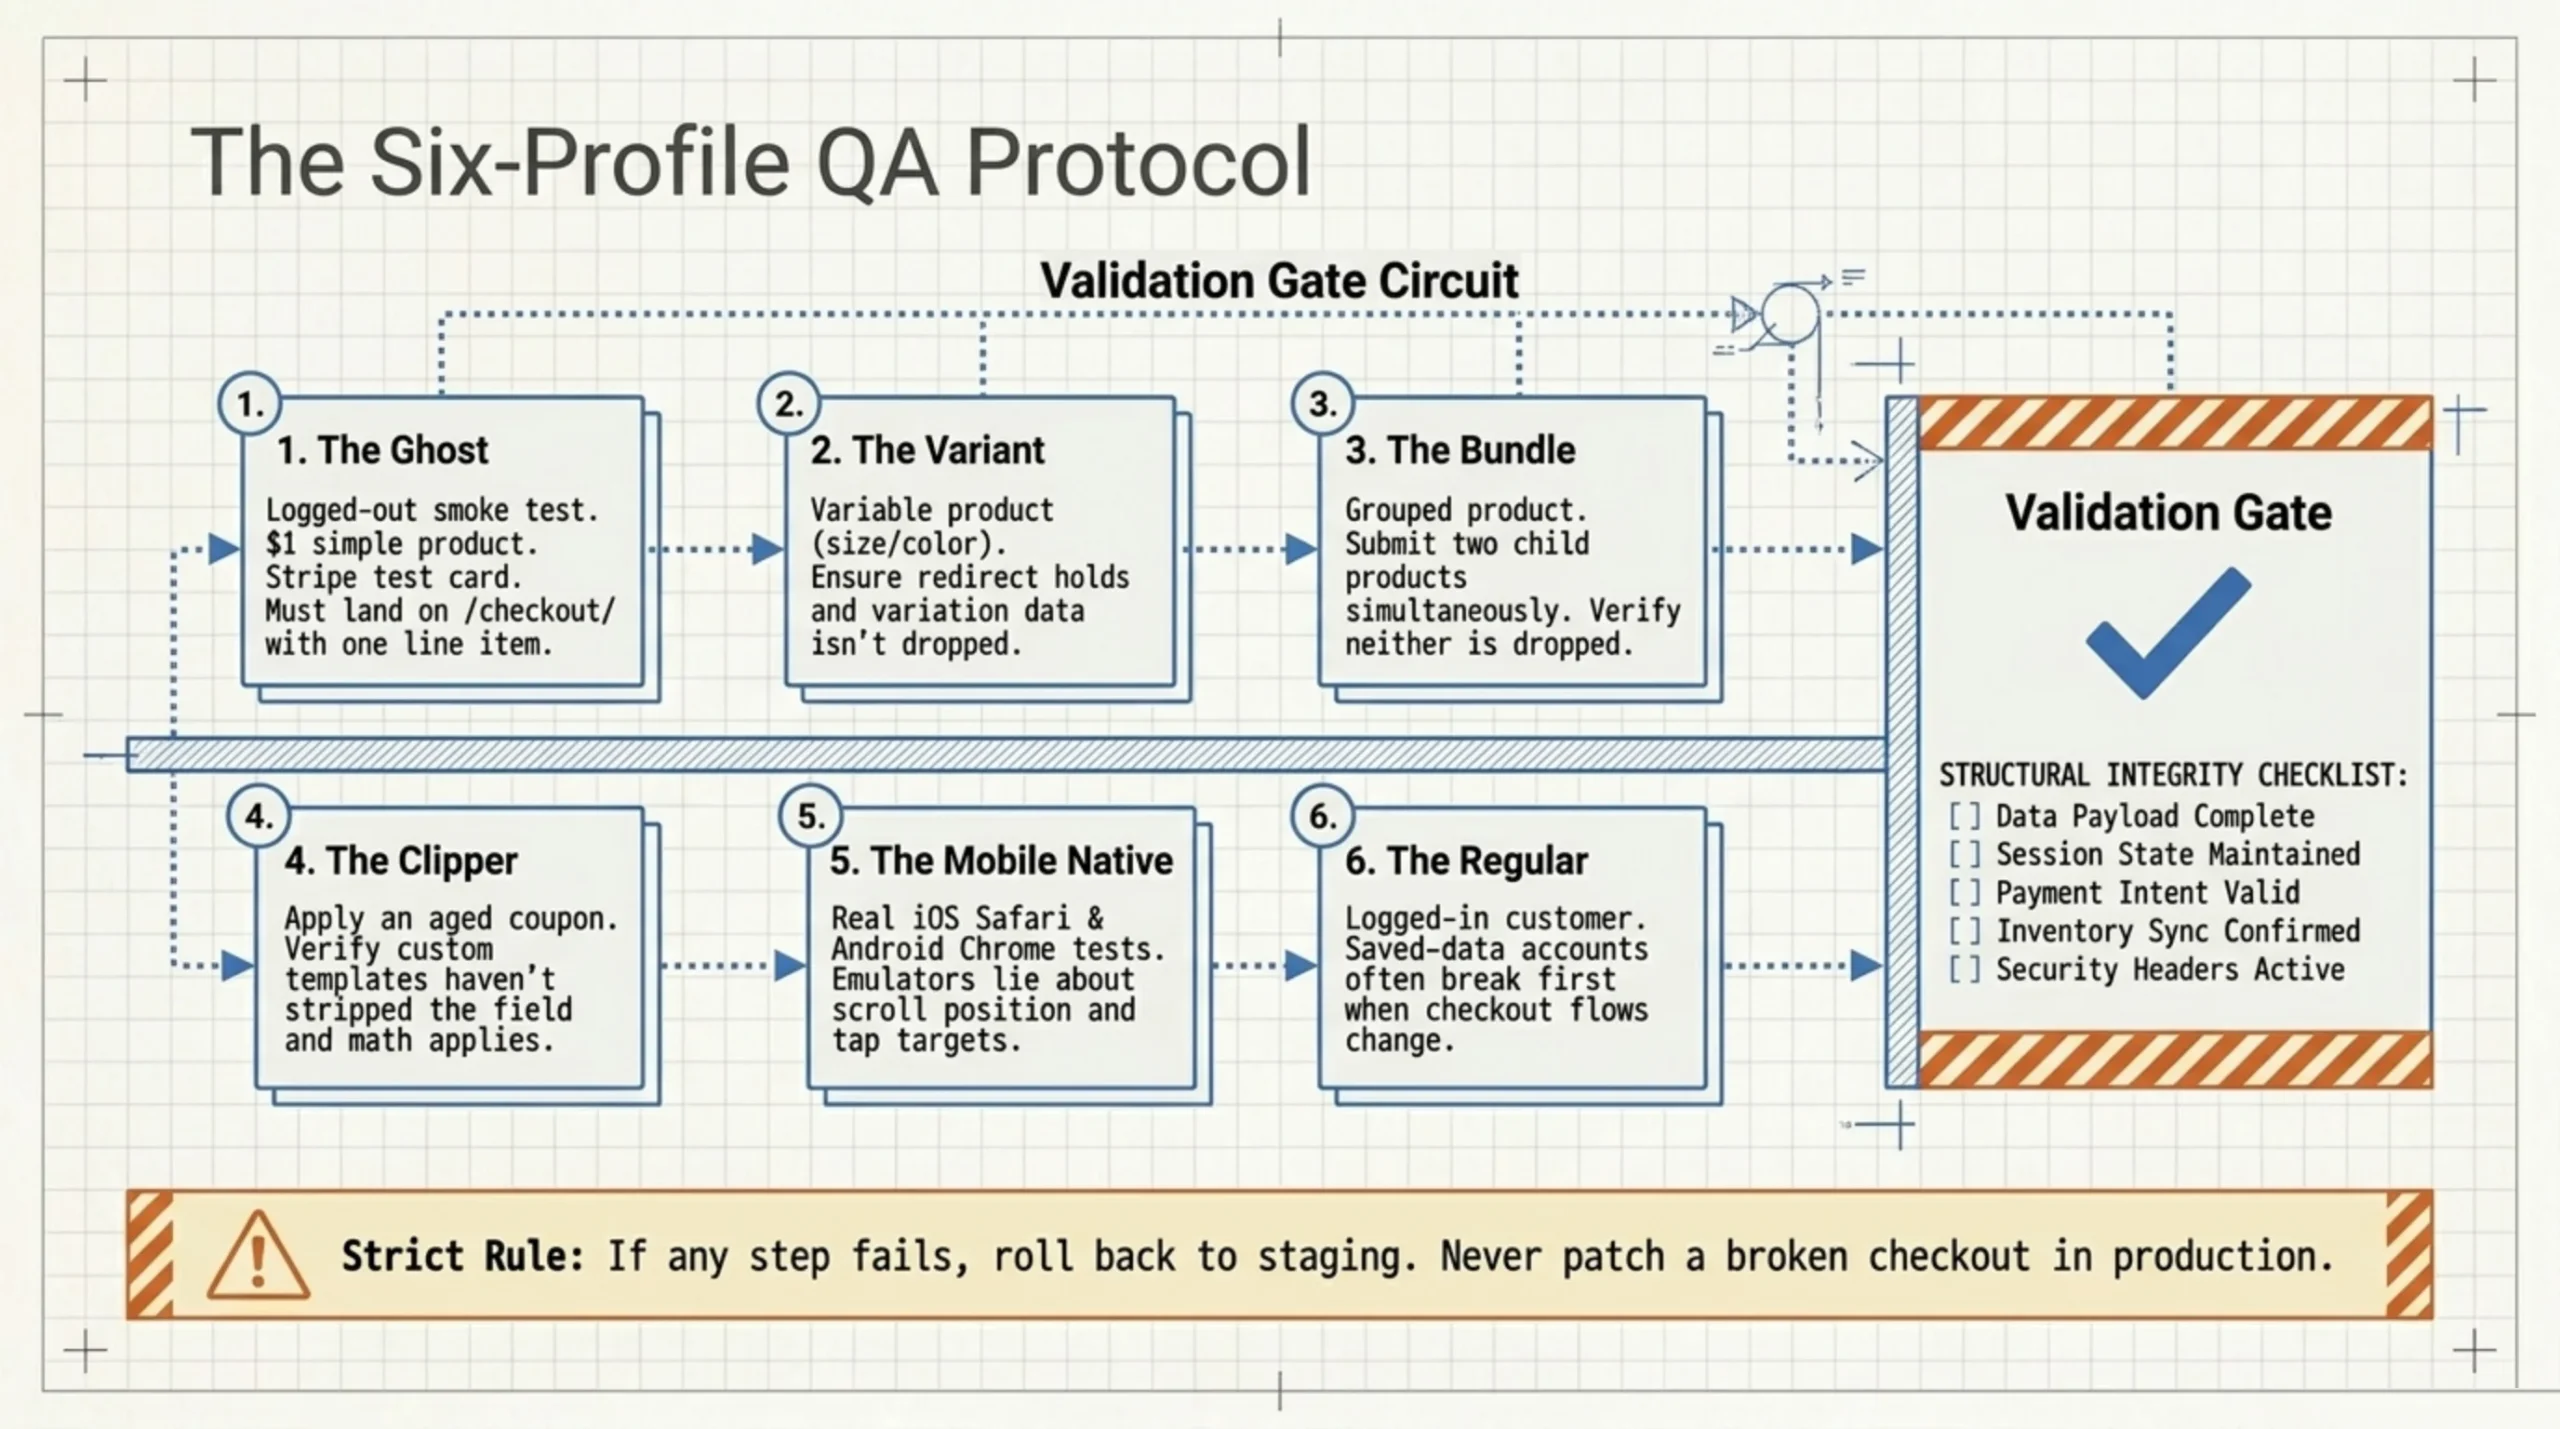
Most blog posts skip this section. They tell you how to flip the toggle and then leave you to figure out whether it works. Here is the procedure I run after any change to checkout flow, including how to set WooCommerce to skip the cart for the first time on a fresh store.
- Smoke test on the live site. Add a $1 simple product to cart while logged out. Confirm you land on
/checkout/with one line item. Use a Stripe test card or your real card if you have refund permissions on the merchant account. - Variable product path. Pick a variable product with size and color. Confirm the redirect still goes to checkout, not back to the product page, and that the right variation is in the order.
- Grouped product path. If you sell grouped products, add two child products in one submit. Verify both reach checkout, neither is dropped, and quantities are correct.
- Coupon path. Apply a coupon at checkout. Confirm the field still exists (some custom checkout templates strip it) and that the discount calculates against the line item, not just the subtotal.
- Mobile path. Repeat steps 1 to 3 on an actual phone. iOS Safari and Android Chrome both. Emulators lie about scroll position and tap targets.
- Logged-in customer path. Log in as a real customer with a saved address and a saved payment method, then run step 1. Saved-data accounts often break first when checkout flow changes.
If any step fails, roll the change back to staging and fix it there. Do not patch a broken checkout in production. I have made that mistake. The recovery is worse than the original bug, by an order of magnitude.
This procedure on how to test WooCommerce checkout takes two to three hours on a real store. It is not optional.
When the Admin Side Also Needs Modernizing
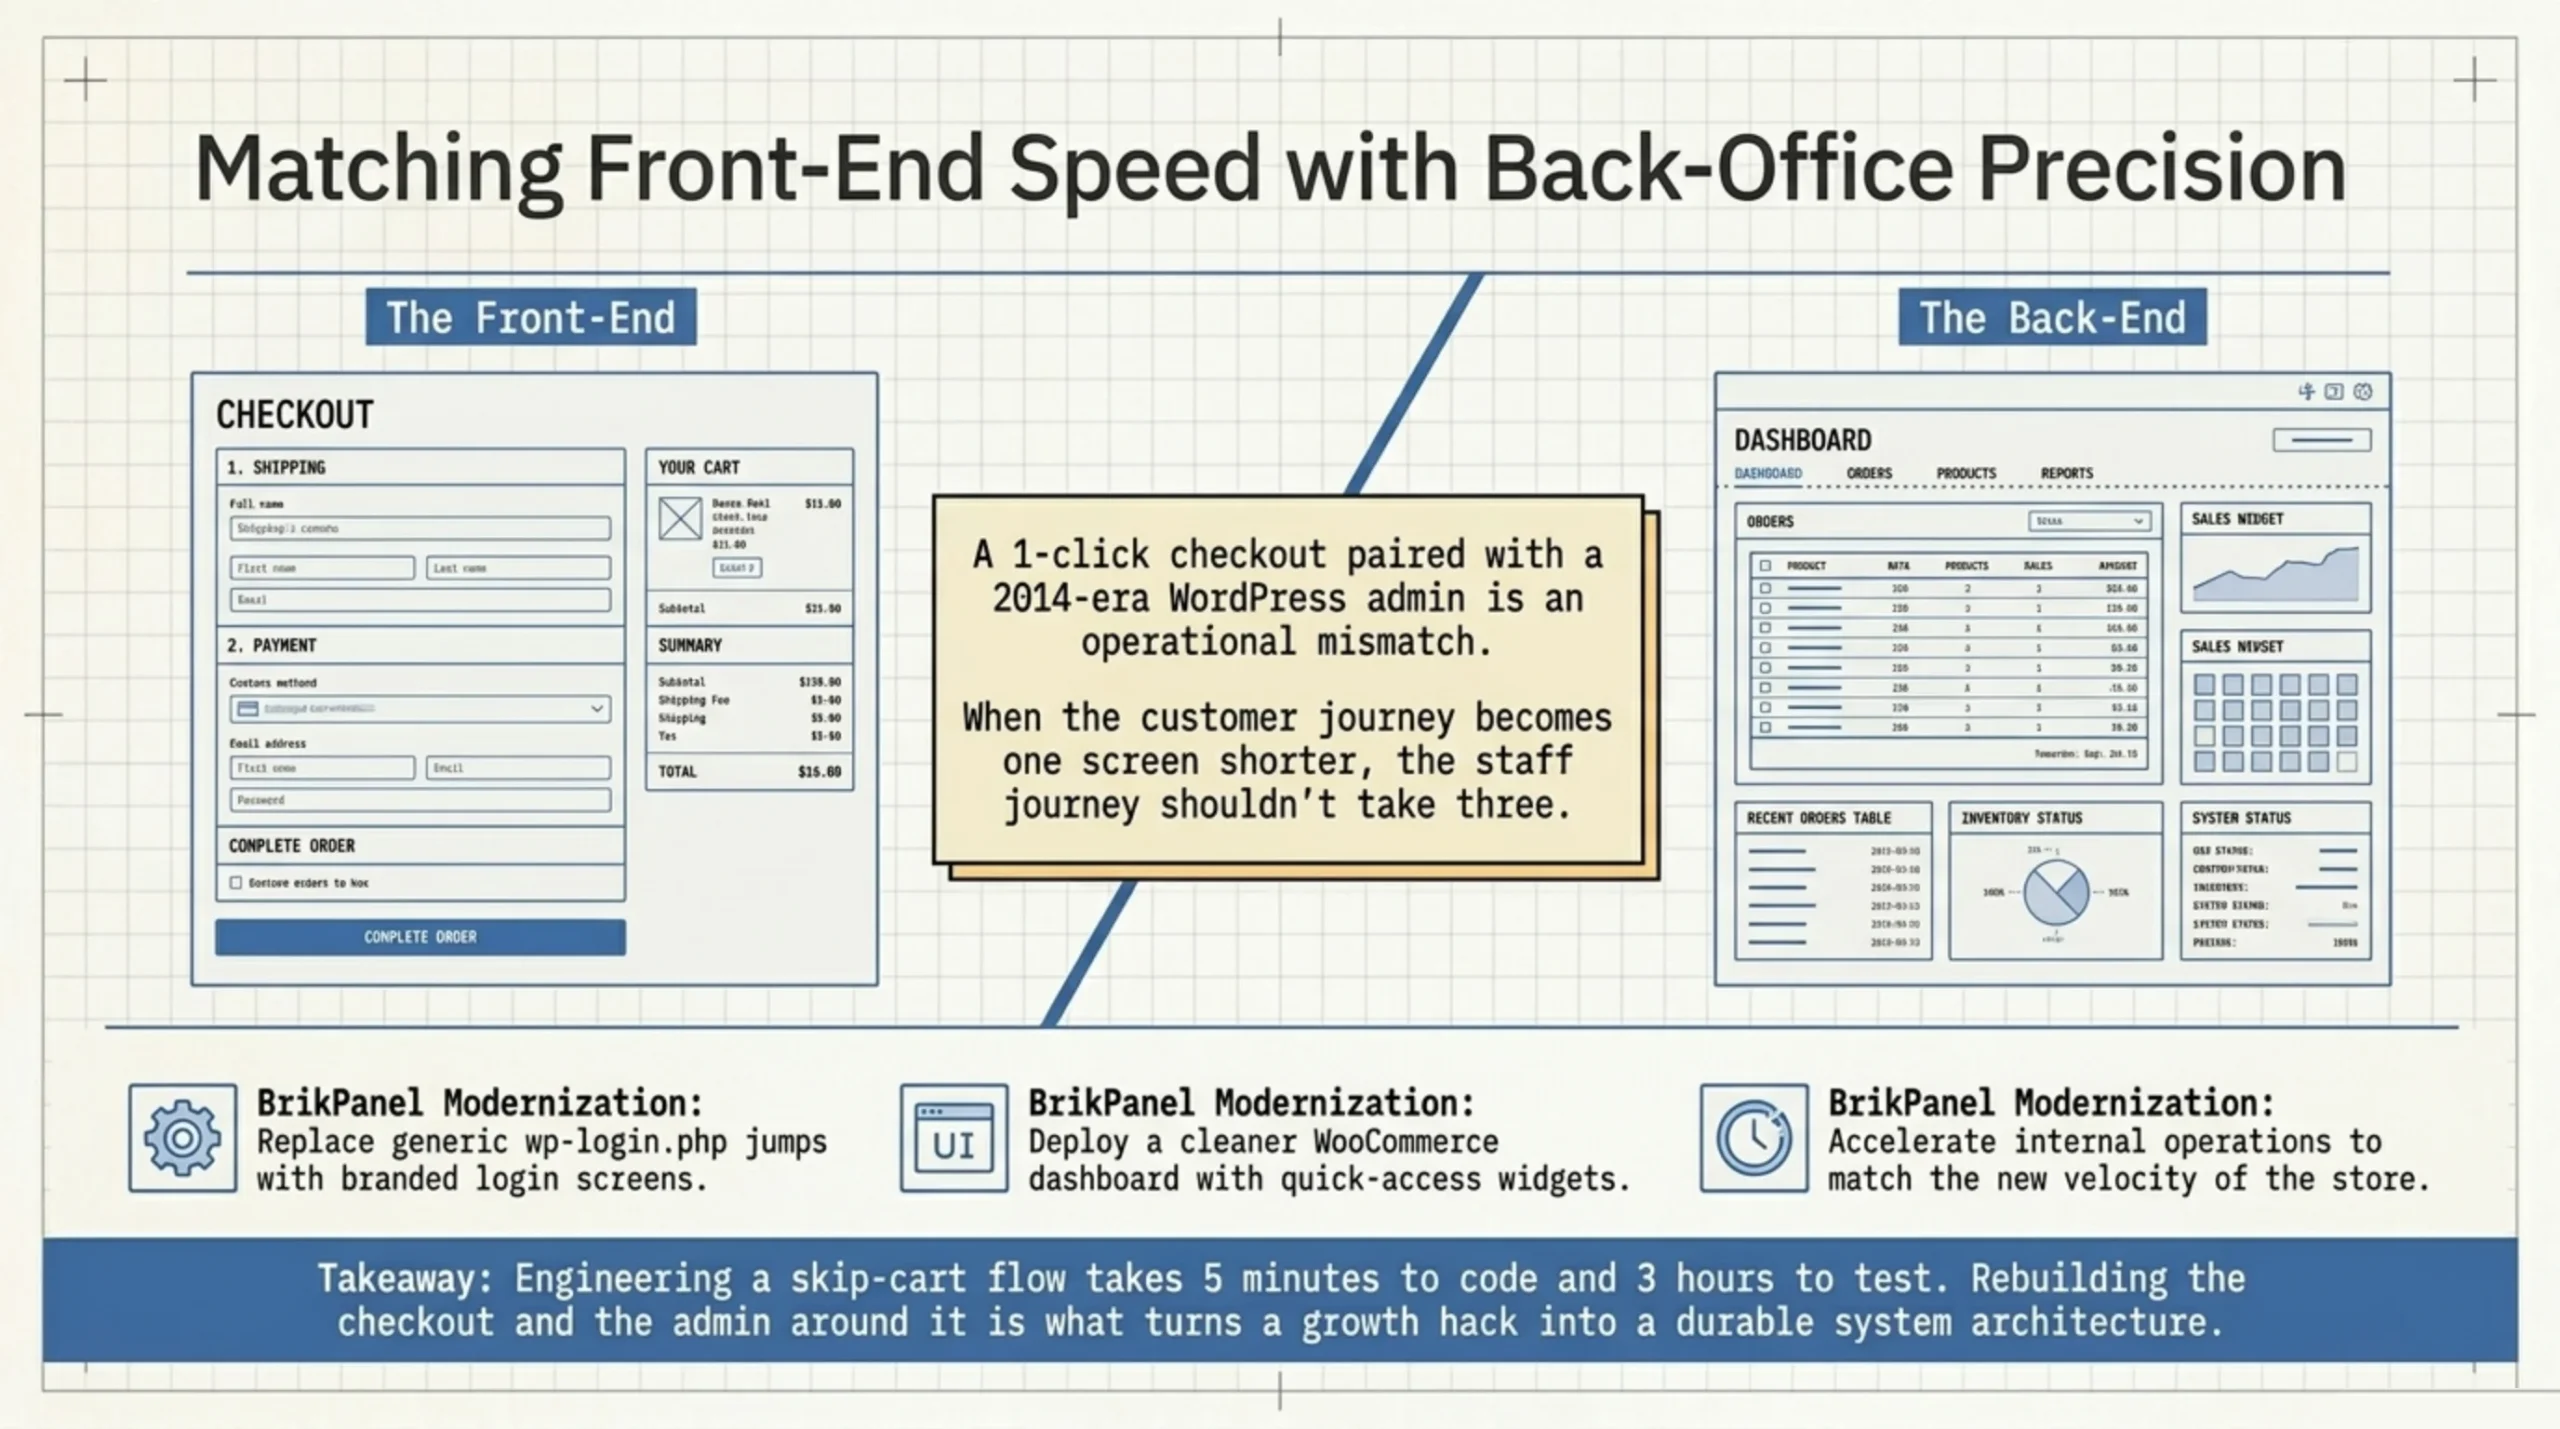
A modernized customer flow against a 2014-era WordPress admin looks ridiculous in practice. Your customer goes from one click to checkout, completes their order, and the store owner logs into a dashboard that has not visually changed since WordPress 4.0. That mismatch costs you internally. Staff are slower because the admin is not built for fast operations. Onboarding new team members takes twice as long as it should because the default WP admin assumes everybody already knows where everything is.
This is where I plug BrikPanel on client stores. It is a free plugin I maintain that gives the WordPress admin a custom-themed login screen, a cleaner WooCommerce dashboard, and quick-access widgets for orders and products. The custom login page in particular matters more than people expect. It is the first screen your team sees ten times a day, and the default wp-login.php does not respect your store branding at all.
I am not pitching it as the only option. Branda from WPMU does similar things. But BrikPanel is what I shipped after I got tired of stitching together five plugins to get a coherent admin theme.
FAQ
Mostly yes, with one caveat. WooCommerce Subscriptions adds its own filters on the add-to-cart redirect, and on some versions they take priority over the woocommerce_add_to_cart_redirect filter shown above. Test the flow on a $0 trial subscription before going live. If it breaks, raise the priority of your filter to 99 to win the order-of-execution fight.
It depends on which plugin you use. Plugins that hook into the cart-creation event keep working, because the cart object still exists in session — you are skipping the display, not the data. Plugins that hook into “user visited /cart/” will not, because that visit no longer happens. Check the plugin’s documentation, or test by abandoning a session deliberately and watching for the recovery email.
Buy Now buttons are cleaner because they are explicit. Users who want to keep shopping click “Add to cart” as a separate action. Users who want to check out immediately click “Buy Now.” A blanket redirect erases that distinction. On stores with mixed shopping patterns I default to the Buy Now approach instead of the global redirect.
The /cart/ URL is still indexable by default and still ranks for branded “your-store cart” queries, which is fine. What you want to avoid is making the cart page redirect to checkout server-side. That creates a redirect loop for logged-out users with cookies disabled. Keep /cart/ reachable directly even if your add-to-cart flow bypasses it.
The toggle and the snippet take five minutes. The testing in the section above takes two to three hours on a real store with variable products and a few payment methods. Budget the testing time. The change itself is trivial. The regression surface is not.
Get a Cleaner WooCommerce Admin to Match Your New Checkout
If you are already overhauling the customer-facing checkout, the admin side is worth the same hour of work. BrikPanel is a free WordPress plugin that gives your WooCommerce admin a custom login page, branded dashboard widgets, and quick-access shortcuts for orders, products, and reports. The custom login page is the feature most relevant to a modernized storefront. It stops the jarring jump from a polished checkout to a generic wp-login.php screen.
Install BrikPanel from WordPress.org. It pairs well with the changes in this guide on how to set WooCommerce to skip the cart, because once your customer journey is one screen shorter, your admin journey should not take three.
Sources Used
- WooCommerce settings configuration documentation — referenced for the location of the cart redirect toggle and recommended reading order before changing settings.
- Baymard Institute cart abandonment rate aggregate — cited for the 70.19% average abandonment rate across 49 studies and the breakdown of reasons users cite.
- WooCommerce developer documentation portal — referenced for Block-based checkout reorder behavior introduced in WooCommerce 8.3.
- CartFlows plugin on WordPress.org — cited as the no-code alternative for adding direct-to-checkout redirects without writing PHP.
- Checkout Field Editor for WooCommerce on WordPress.org — referenced as the case where a plugin makes sense for conditional checkout fields.
- BrikPanel admin panel plugin — linked in the admin modernization section and the closing CTA.
